

11 Simple Valentines Nails 2026 Ideas That Feel Fresh, Chic, and Easy
Valentine’s Day has always been the perfect excuse to indulge in a romantic manicure, but the tired clichés of overly sweet hearts and bright red polish are fading fast. This year, the most requested Simple Valentines Nails nail designs lean toward sophisticated simplicity rather than over-the-top declarations of love. Whether you’re planning a romantic date night, celebrating with friends, or simply treating yourself, the best Valentine nails in 2026 prove that elegance and ease can coexist beautifully.
The beauty world has shifted toward wearable luxury, and Valentine’s Day manicures are no exception. Gone are the days when February 14th nails needed to scream their theme from across the room. Instead, modern designs embrace subtle romance through carefully chosen colors, refined textures, and minimalist details that feel intentional rather than costume-like. These aren’t the Valentine nails of your childhood. They’re grown-up, versatile, and designed to look stunning well beyond the holiday itself.
What makes a Valentine manicure truly simple in 2026 is its ability to balance festive charm with everyday wearability. The designs gaining popularity right now require minimal tools, fewer steps, and less technical skill than you might expect. Many can be recreated at home with basic supplies, while others translate seamlessly into salon requests that won’t leave your nail technician confused. From glossy soap nails to delicate micro hearts, these ideas prove that simplicity doesn’t mean sacrificing style.
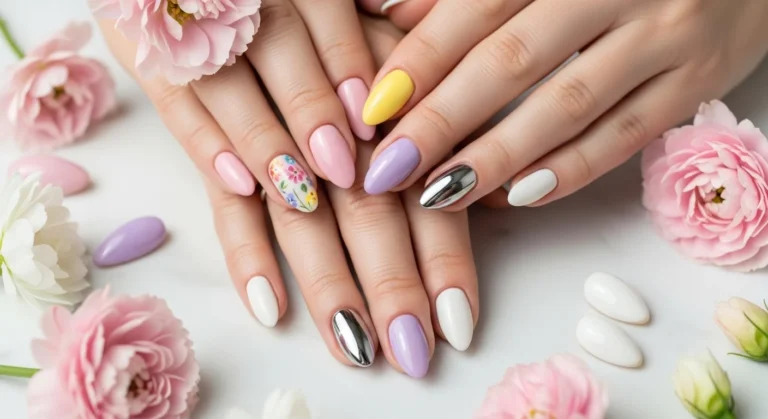
1: Glossy Soap Nails with Minimal Heart Accents

The soap nail trend has dominated social media throughout early 2026, and it’s become the foundation for one of the most elegant Valentine’s Day looks available. These nails feature a milky, translucent base that mimics the sheer finish of luxury hand soap, creating an expensive appearance that photographs beautifully. The effect is achieved through sheer pink or nude polishes applied in thin layers, then sealed with an ultra-glossy top coat that creates almost glass-like shine.
What makes this design particularly appealing for Valentine’s Day is its versatility. The neutral base works with any outfit or occasion, from office meetings to dinner dates. Adding tiny heart accents transforms the look just enough to feel festive without appearing costume-like. Most people choose to place one or two micro hearts near the cuticle on accent nails only, keeping the overall aesthetic clean and modern.
Creating soap nails at home requires patience more than skill. The key lies in building translucent color gradually through multiple thin coats rather than attempting full coverage in one application. Allow each layer to dry completely before adding the next, and finish with a high-quality top coat that amplifies shine. For the heart details, small nail decals provide the easiest application method, though steady hands can paint them freehand using a thin detailing brush.
2: Cat Eye Magnetic Polish in Deep Romantic Shades
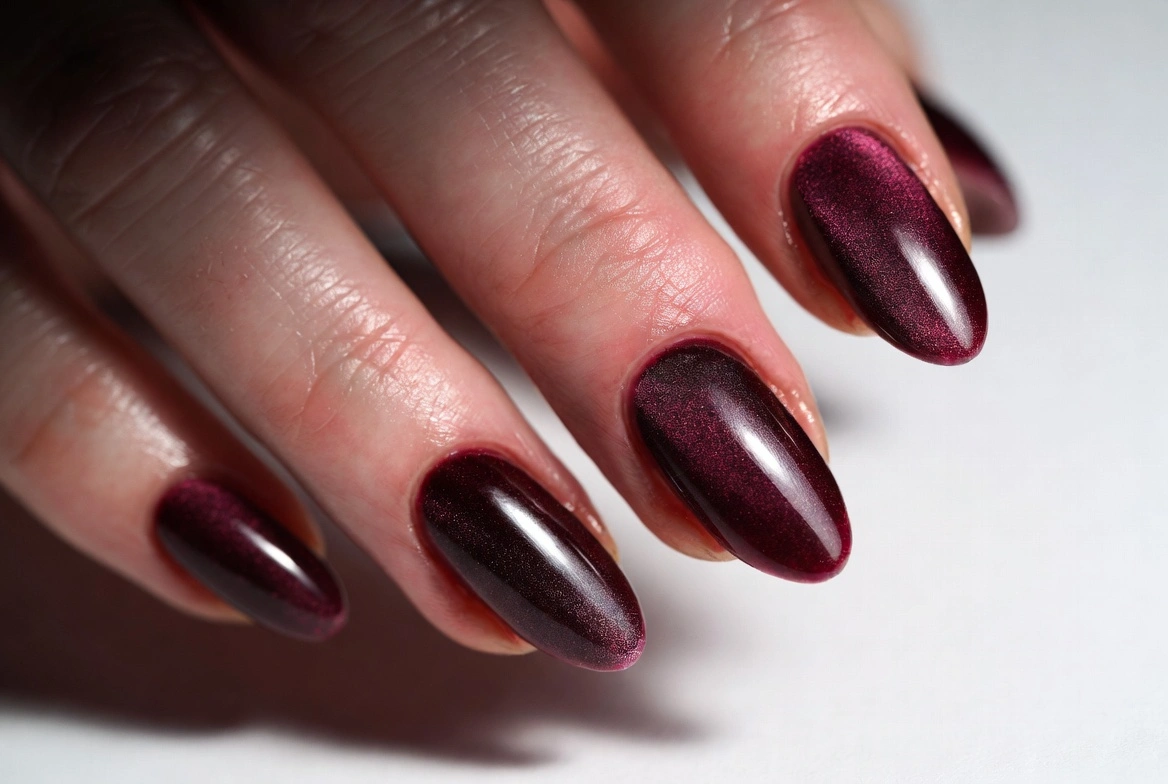
Cat eye nails have evolved from flashy statement pieces into sophisticated essentials, and the Valentine’s Day interpretation showcases this maturity perfectly. The magnetic effect creates a subtle shimmer that shifts and changes under different lighting conditions, adding depth without relying on glitter or chunky embellishments. Deep shades like burgundy, wine, chocolate brown, and classic red work particularly well for this technique.
The appeal of cat eye nails for Valentine’s Day extends beyond their visual impact. They offer a grown-up alternative to traditional glittery finishes while still providing that special occasion feel. The effect reads as luxurious and intentional, suggesting you put thought into your appearance without trying too hard. The velvet-like finish catches light in subtle ways throughout the day, creating interest without demanding attention.
Achieving the cat eye effect at home has become significantly easier with the proliferation of magnetic gel polishes and user-friendly kits. After applying the polish, you hold a small magnet over the wet nail surface, which pulls metallic particles into patterns that create the signature stripe of light. Some people enhance their Valentine’s Day cat eye nails by adding tiny heart shapes using a paperclip attached to the magnet, creating a romantic twist on the classic technique.
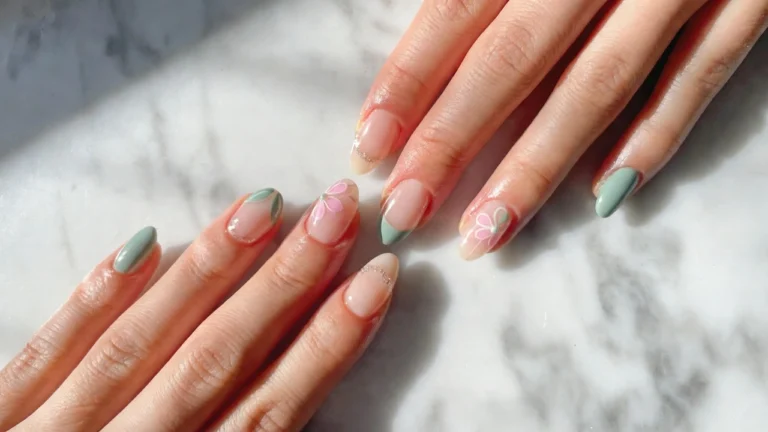
3: Micro Heart French Tips
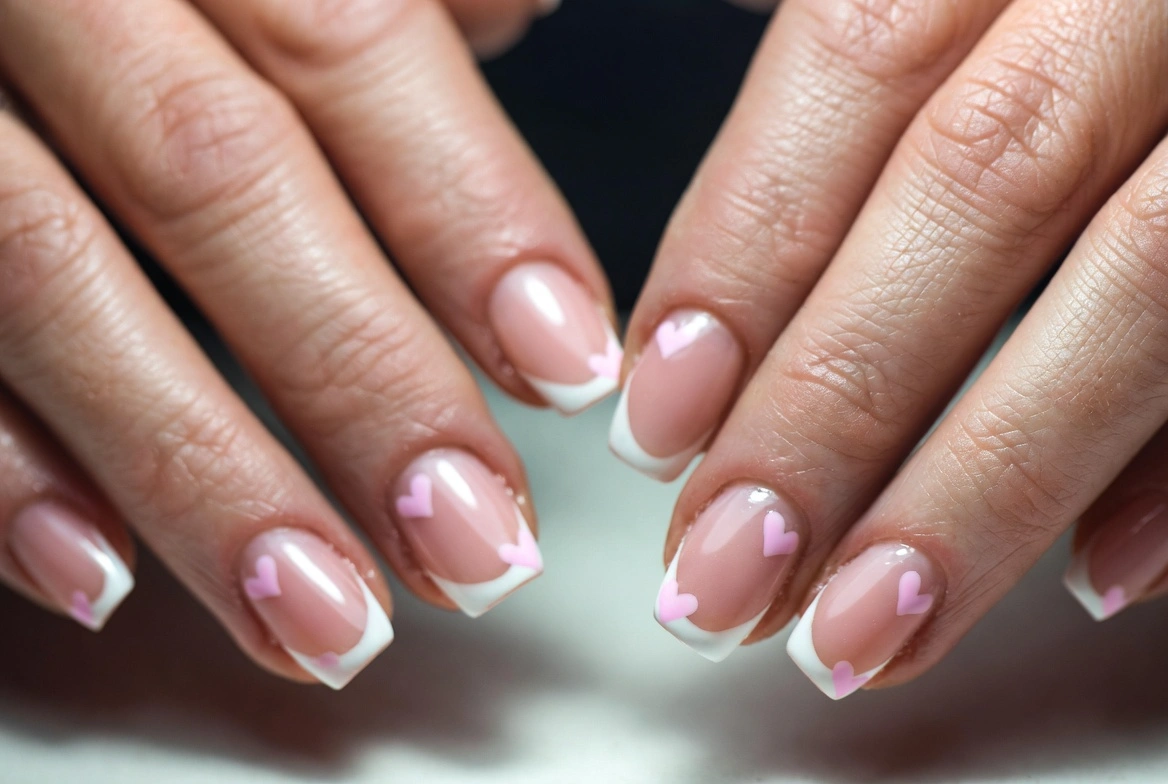
French manicures never truly disappear from fashion, they simply reinvent themselves for each season. The Valentine’s Day version replaces traditional white tips with small heart shapes painted at the nail edges. This design manages to feel both classic and contemporary, honoring the French manicure tradition while incorporating obvious Valentine symbolism in a refined way.
The beauty of heart-tipped French nails lies in their approachability. Unlike intricate nail art that requires steady hands and artistic talent, these hearts don’t need to be perfect. Their curved, organic shape means slight irregularities blend into the design rather than standing out as mistakes. The thicker shape of hearts compared to traditional French tips also makes them easier to paint, even for beginners working with their non-dominant hand.
To create this look, start with a sheer pink or nude base that mimics your natural nail color. Once dry, use a regular nail polish brush to paint small heart shapes at the tip of each nail. Working from the top down often produces cleaner results than attempting to outline the heart first. Two coats of heart color usually provide sufficient coverage, and a glossy top coat seals everything together while smoothing any uneven edges.
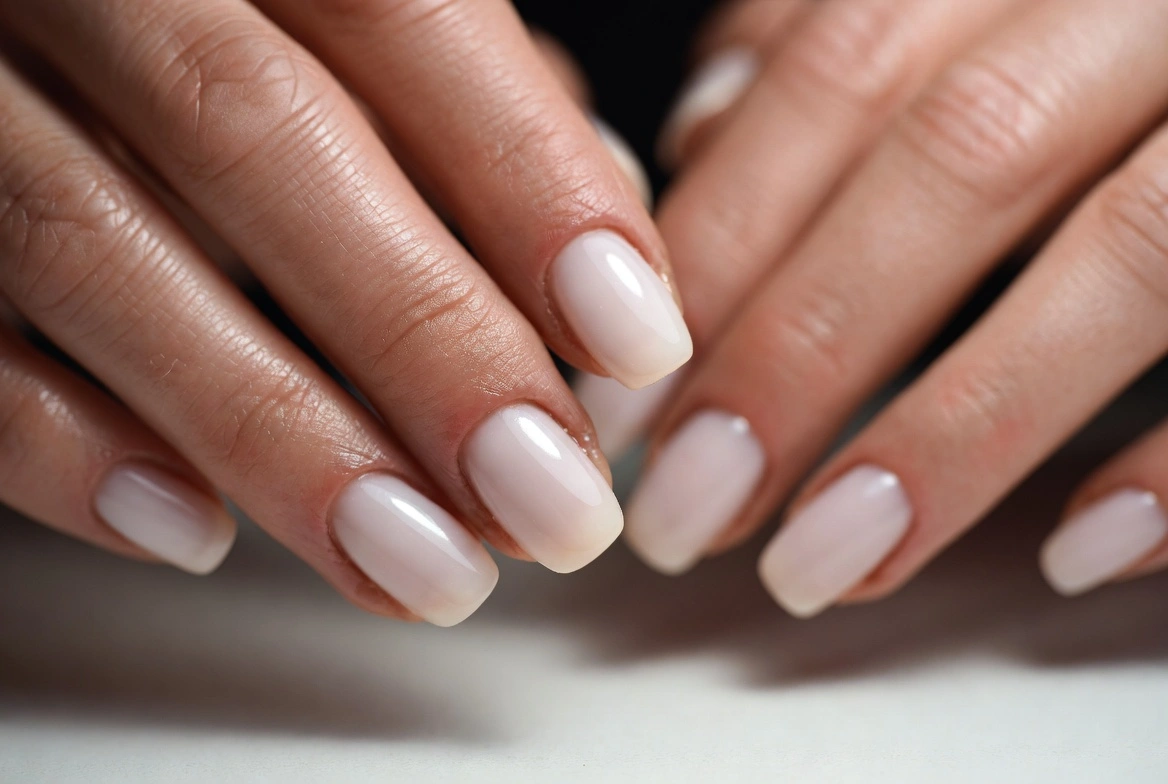
4: Classic Pink Nails with High Shine Finish
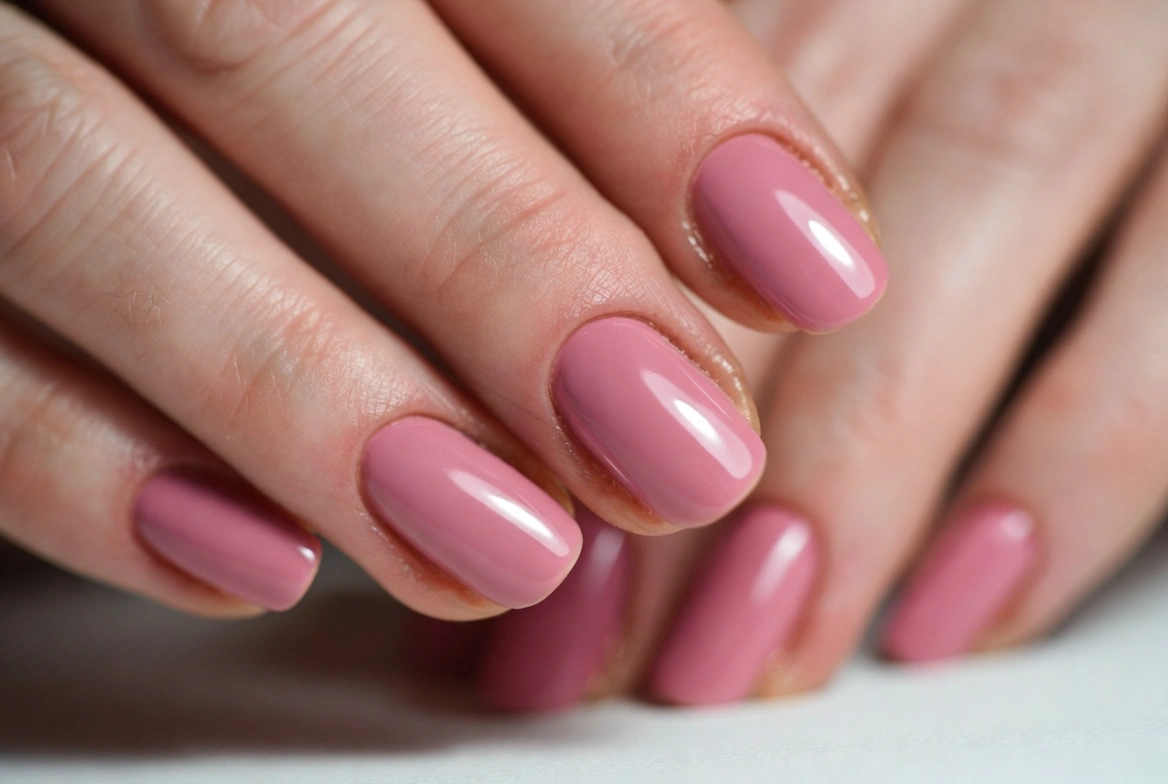
Sometimes the most impactful choice is also the simplest. A classic pink manicure executed flawlessly can outperform elaborate nail art in both elegance and versatility. The key to making basic pink nails feel special for Valentine’s Day lies entirely in the quality of application and the intensity of shine achieved through proper top coat selection.
Pink remains eternally associated with romance, but the specific shade you choose dramatically affects the overall mood. Soft ballet pinks create an innocent, delicate impression. Deeper rose tones feel more sophisticated and grounded. Bright bubblegum shades inject playfulness and energy. Consider your personal style and the impression you want to create when selecting your perfect pink.
The application process for perfect pink nails requires attention to detail rather than complex technique. Proper nail preparation creates the foundation for smooth color application. Apply thin coats rather than thick ones, allowing each layer to dry completely before adding the next. Two to three coats typically achieve full, even coverage. The final top coat deserves special attention, as this layer creates the mirror-like finish that elevates simple polish into something special.
5: Berry Dot Nails on Neutral Base
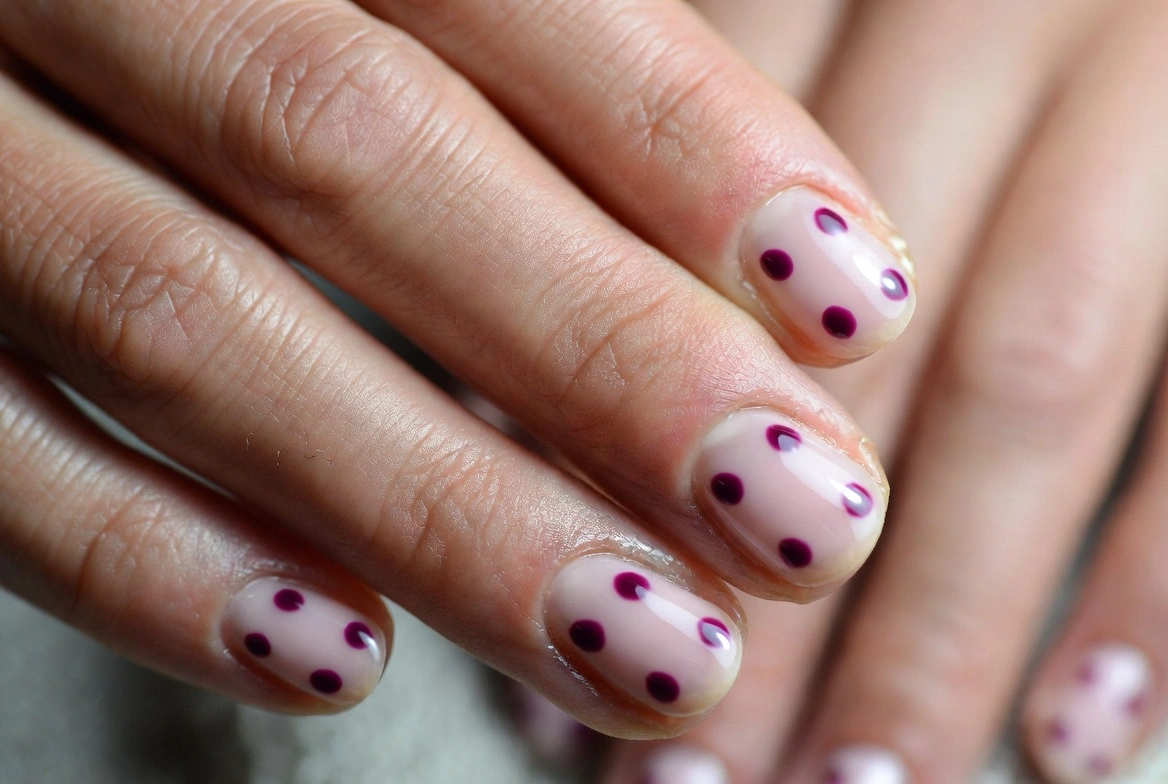
Polka dot manicures have circulated through nail trends for decades, but the Valentine’s Day interpretation brings fresh sophistication to this playful pattern. Instead of bright, contrasting dots scattered across vivid bases, the modern version features deep berry or wine-colored dots placed strategically on pale pink or nude backgrounds. The effect reads as sweet without being saccharine.
This design offers perfect balance for people who want to acknowledge Valentine’s Day without committing to obviously themed nails. The dots provide just enough pattern and color to feel festive, while the neutral base keeps everything grounded and wearable. The look translates beautifully across different settings, from professional environments to casual weekend plans.
Creating polka dot nails requires only one specialized tool: a dotting implement. Professional nail dotting tools work wonderfully, but household items like bobby pins, toothpicks, or the tip of a ballpoint pen create similarly effective results. Dip your chosen tool into polish, then press it gently against the dry base color to transfer a perfect circle. Vary the dot sizes or keep them uniform depending on your aesthetic preference.
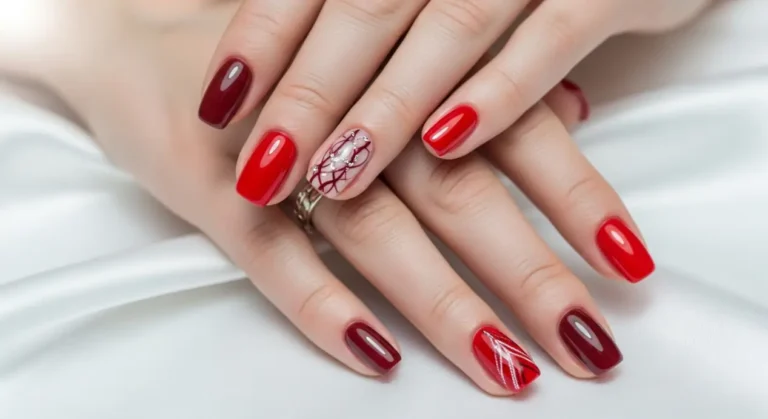
6: Thin Red Line Accent on Nude Nails
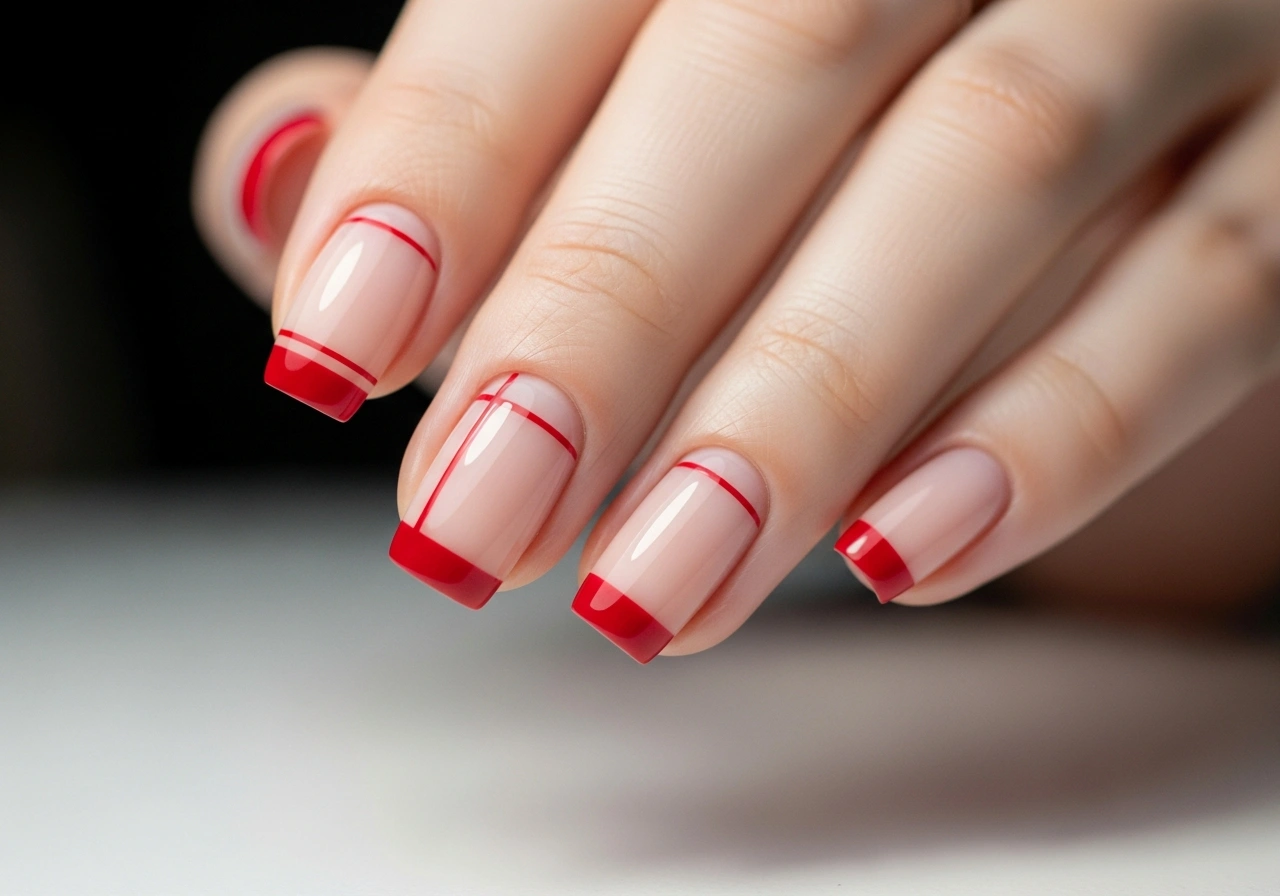
Minimalist nail art has gained tremendous ground in recent years, and this design represents the concept at its most refined. A single thin red line placed near the nail tip or running down the center creates subtle visual interest without overwhelming the natural nail. The negative space approach feels modern and intentional, suggesting confidence in restraint.
This style works particularly well for people with conservative dress codes or anyone who prefers understated beauty. The single line of color provides just enough Valentine’s Day reference to feel seasonal without appearing costume-like. The design ages gracefully as it grows out, maintaining clean appearance longer than more complex nail art.
Achieving perfectly straight lines requires a steady hand and the right tools. Thin striping brushes designed specifically for nail art provide the most control, though careful work with regular polish brushes can produce acceptable results. Some people prefer using striping tape to create perfectly straight edges, painting between the tape lines and removing them once the polish dries. Practice on paper first if you’re attempting freehand lines for the first time.
7: Sheer Black Nails with White Heart Details
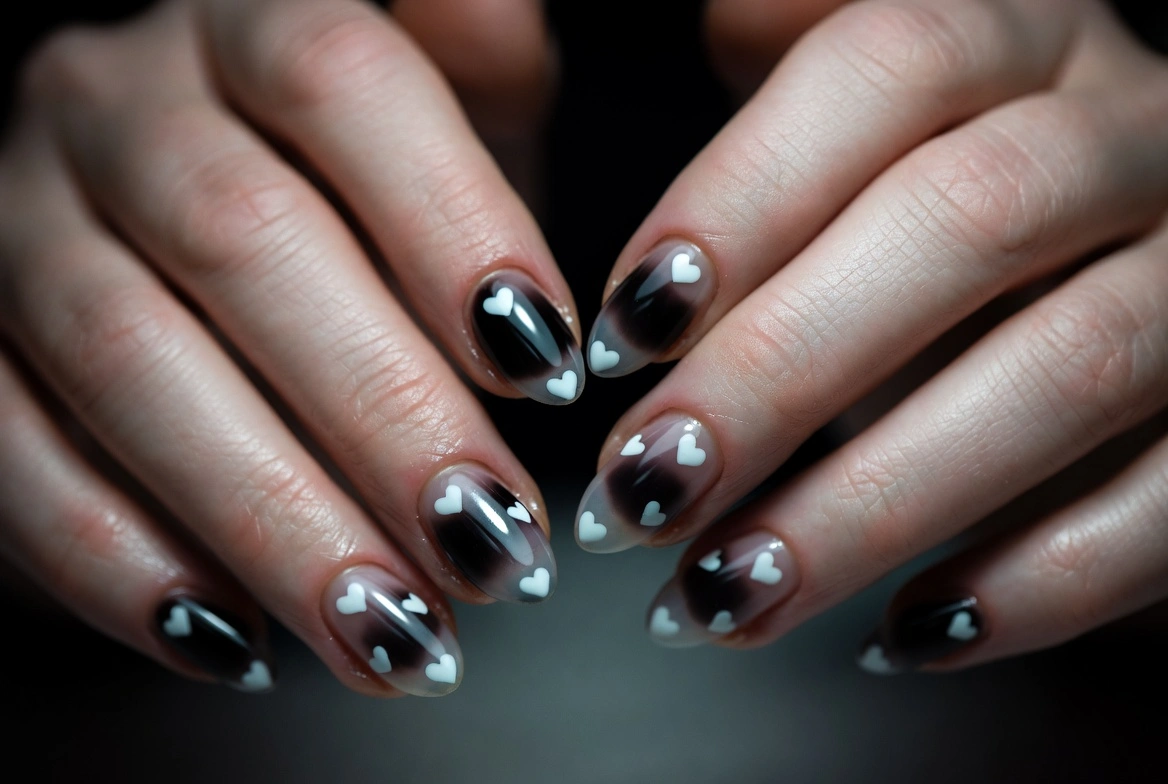
Black Valentine’s Day nails might seem counterintuitive at first, but the trend has gained significant traction among people seeking alternatives to traditional pink and red palettes. Sheer black polish creates a sophisticated, slightly moody base that feels unexpectedly romantic when paired with delicate white hearts. The contrast between dark base and light details creates visual impact while maintaining overall subtlety.
This design appeals to people who love Valentine’s Day but don’t connect with conventionally sweet aesthetics. The black base grounds the romantic elements, creating balance between celebration and personal style. The look works beautifully for evening events, adding edge to cocktail dresses or lending interest to all-black outfits.
Application begins with building the sheer black base gradually through multiple thin coats. Unlike opaque black polish, the sheer version allows some of your natural nail to show through, creating depth and preventing the color from appearing harsh. Once the base dries completely, small white heart stickers provide the easiest application method for the decorative elements. Alternatively, steady hands can paint hearts using white polish and a fine detail brush.
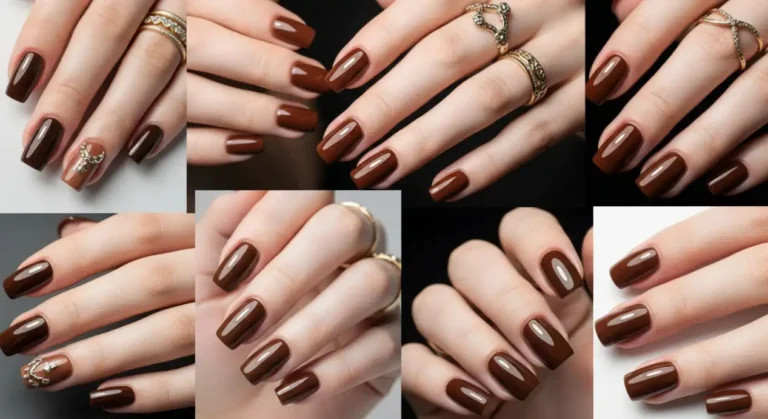
8: Short Almond Nails in Deep Merlot

Nail shape influences the overall impression of any manicure, and the short almond shape has emerged as particularly flattering for Valentine’s Day designs. The gently tapered sides and rounded tip create a feminine silhouette without the impracticality of extreme length. When paired with rich merlot or burgundy polish, the result feels elegant and romantic without requiring any additional decoration.
Deep wine shades offer sophisticated alternatives to bright Valentine’s Day reds. These colors feel more versatile and grounded, working equally well in professional settings and romantic dinners. The depth of color creates visual interest on its own, eliminating the need for additional nail art or embellishments. A glossy finish enhances the richness of the shade, while matte top coats create dramatic, velvety effects.
Achieving the short almond shape requires careful filing technique. Begin by filing straight across the nail tip, then gently round the corners while maintaining slight tapering toward the center. The goal is subtle shaping rather than dramatic points. File in one direction rather than sawing back and forth, which can damage the nail edge and create splits. The shape should enhance your natural nail bed rather than fighting against it.
9: Milky White Base with Soft Pink French Tips
The reverse French manicure concept has evolved into countless variations, and this Valentine’s Day interpretation showcases the technique’s versatility. A milky white base provides creamy opacity while maintaining softness, and delicate pink tips add just enough color to signal the season. The combination feels fresh and modern while honoring classic French manicure principles.
This design particularly suits people with shorter nails who find traditional French tips visually overwhelming. The subtle color transition creates the illusion of length without requiring actual length, and the soft palette works across all skin tones. The look translates well from day to night, maintaining professionalism while adding refined polish to your overall appearance.
Creating this manicure at home requires patience and possibly some practice with tip painting. Begin with a milky white base applied in two to three thin coats for full coverage. Once completely dry, use a thin brush to paint soft pink crescents at each nail tip. Keeping the pink band relatively narrow maintains the delicate aesthetic. Some people find it easier to use curved nail guides or tape to create clean edges, though freehand application works well once you develop muscle memory for the motion.
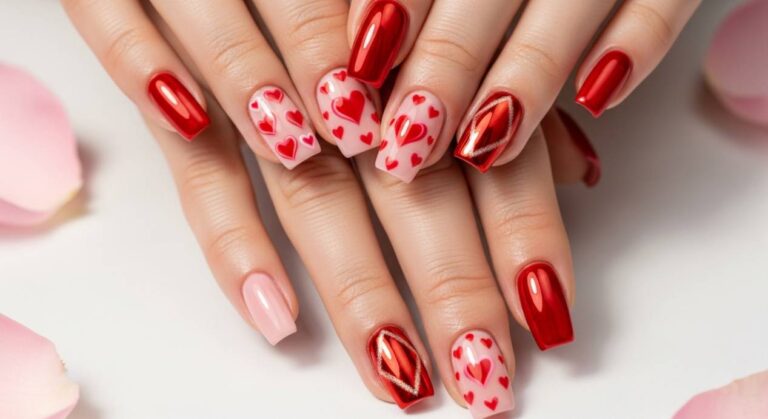
10: Single Red Heart Accent on Natural Nails
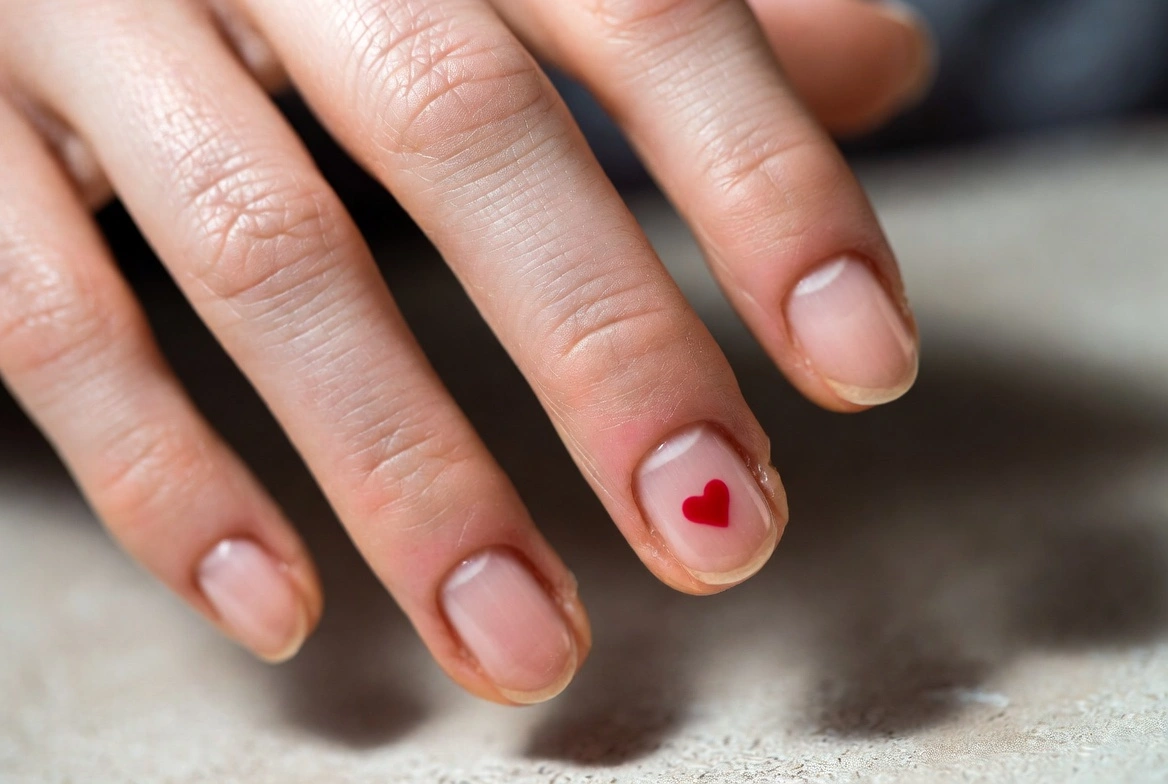
Sometimes the most powerful statement comes from the smallest gesture. A single red heart placed on otherwise natural nails creates a whisper of Valentine’s Day celebration rather than a shout. This approach works beautifully for people who avoid polish altogether most of the year but want to acknowledge the holiday with minimal commitment.
The beauty of this design lies in its flexibility. The heart can be placed anywhere: near the cuticle, at the nail tip, off to one side, or centered in the middle. Most people choose to add hearts to just one or two fingers per hand, typically the ring finger or both ring fingers. This selective placement maintains the minimalist aesthetic while providing enough festive detail to feel intentional.
Creating this look requires very little time or product. Begin with a clear base coat to protect your natural nails and create a smooth surface. Once dry, apply a single red heart using a small decal, sticker, or freehand painting. Seal everything with clear top coat to protect the design and blend the edges. The entire process takes less than ten minutes and removes easily when you’re ready to return to completely bare nails.
11: Ombre Pink to Red Gradient
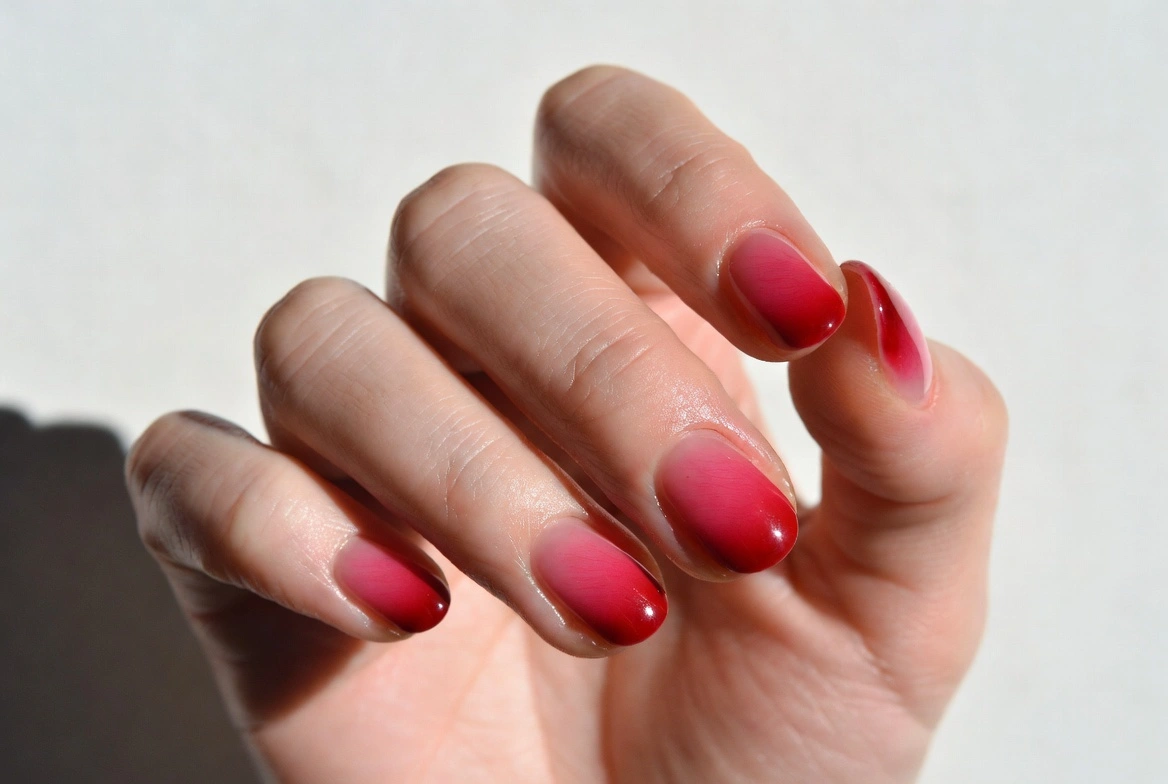
Gradient nails create smooth color transitions that feel inherently romantic, and the pink to red progression embodies Valentine’s Day without relying on obvious symbols. The technique produces sophisticated results that photograph beautifully, making it popular for people planning to share their manicure on social media or capture it in date night photos.
The ombre effect works across all nail lengths and shapes, adapting easily to personal preferences. Subtle gradients create understated elegance, while more dramatic color shifts make bolder statements. The technique allows you to incorporate Valentine’s Day colors while maintaining a refined, artistic approach that avoids feeling costume-like.
Achieving smooth gradients at home requires the right tools and technique. Small makeup sponges work perfectly for this purpose. Apply your lightest color as a base coat over the entire nail. Once dry, paint stripes of your chosen colors onto the sponge in the order you want them to appear on your nail. Gently dab the sponge onto your nail, blending where the colors meet. Multiple light applications create smoother transitions than single heavy ones. Clean up excess polish around your nail using a small brush dipped in remover, then seal everything with top coat.
Creating Your Perfect Valentine’s Day Manicure at Home
Achieving salon-quality results at home requires the right preparation and tools rather than professional training. Begin by properly shaping your nails using a good quality file, working in one direction to prevent splitting. Push back cuticles gently using a wooden stick or cuticle pusher, but avoid cutting them unless absolutely necessary. Buffing the nail surface lightly creates texture that helps polish adhere better and last longer.
Quality products make significant differences in final results. Invest in a good base coat that protects your natural nails and creates an even surface for color. Choose polishes from reputable brands that provide smooth, even coverage without excessive streaking. Most importantly, select a high-quality top coat that provides the glossy finish and extended wear that separate professional manicures from amateur attempts. These products don’t need to be extremely expensive, but complete bargain options rarely perform well.
The application technique matters as much as the products themselves. Thin coats dry faster and look smoother than thick ones, so build color gradually rather than attempting full coverage in one pass. Allow each layer to dry completely before adding the next. This patience prevents smudging and creates more durable manicures. Cap the free edge of each nail by running the brush across the tip, sealing polish and preventing chips. Work in a well-ventilated area and give yourself plenty of time rather than rushing through the process.
Choosing Colors and Finishes That Complement Your Style
Valentine’s Day doesn’t require you to abandon your personal aesthetic in favor of conventional holiday colors. The most successful seasonal manicures incorporate festive elements while remaining true to individual style preferences. If you typically avoid bright colors, deep burgundies and soft roses provide Valentine’s Day relevance without forcing you outside your comfort zone. People who embrace bold statements can lean into vibrant reds and hot pinks with confidence.
Consider your typical wardrobe when selecting nail colors. Polishes that complement your most-worn pieces create cohesive, polished appearances that feel intentional. If your closet contains primarily neutrals, any Valentine’s Day shade will work beautifully. Those who favor colorful wardrobes should consider how different reds and pinks interact with their favorite hues. Some reds lean orange while others pull blue, and these undertones can either harmonize or clash with your clothing.
Finish selection dramatically affects the overall mood of any manicure. Glossy finishes feel classic and polished, reflecting light and creating that fresh-from-the-salon appearance. Matte top coats transform the same colors into sophisticated, modern statements that feel more editorial than traditional. Shimmer and metallic finishes add subtle sparkle without the chunky texture of glitter. Some people alternate finishes across different nails for added visual interest, though this approach requires careful balance to avoid appearing disjointed.
Making Your Valentine’s Day Manicure Last Longer
Even the most beautiful manicure loses its appeal once chips and wear become visible. Extending the life of your Valentine’s Day nails begins with proper application technique but continues through daily maintenance and care. Always apply base coat before color and top coat after, as these layers protect both your natural nails and your polish. Cap the free edge of each nail during every layer of product application to seal the tips where chipping most commonly begins.
Avoid exposing fresh manicures to water for at least two hours after application. Polish may feel dry to the touch long before it hardens completely throughout all layers, and premature water exposure can cause bubbling, shrinking, or peeling. If you must wash your hands shortly after painting your nails, use lukewarm rather than hot water and avoid prolonged soaking.
Daily activities present constant threats to manicure longevity, but simple precautions make significant differences. Wear gloves when cleaning, washing dishes, or doing yard work. These tasks expose nails to harsh chemicals and prolonged water contact that quickly degrade polish. Apply cuticle oil daily to maintain nail and skin health while preventing polish from becoming brittle. Reapply top coat every two to three days to refresh shine and reinforce protection against chips.
Conclusion
Valentine’s Day nails in 2026 have evolved far beyond the obvious hearts and bright reds that once defined seasonal manicures. The most popular designs now embrace sophisticated simplicity, proving that romance and restraint create beautiful partnerships. From glossy soap nails to elegant ombre effects, these eleven ideas demonstrate how festive details can enhance rather than overwhelm your natural style.
The shift toward wearable Valentine’s Day nails reflects broader changes in how people approach seasonal beauty. Modern consumers want designs that acknowledge special occasions without limiting their versatility or requiring immediate removal once the holiday passes. The ideas presented here work equally well for romantic dinners, professional meetings, casual weekends, and everything between. They celebrate Valentine’s Day through subtle nods rather than costume-like declarations.
Creating beautiful Valentine’s Day nails no longer requires professional help or advanced artistic skills. Many of these designs can be achieved at home with basic supplies and reasonable patience. The key lies in choosing approaches that match your comfort level and aesthetic preferences rather than forcing yourself into trends that feel foreign. Whether you embrace classic pink polish or explore minimalist line art, your Valentine’s Day manicure should make you feel confident, polished, and authentically yourself.
You may also like his post: Square Valentines Nails 2026: 21 Fresh & Flirty Ideas You’ll Love
Frequently Asked Questions
What nail shape works best for simple Valentine’s Day designs?
Short oval and short almond shapes work beautifully for simple Valentine’s Day nails because they provide enough surface area for designs while remaining practical for daily activities. These shapes flatter most hand types and look polished without appearing overdone. Square and round shapes also work well, particularly for minimalist designs. Choose the shape that feels most comfortable and natural for your lifestyle rather than forcing a trend that doesn’t suit your needs.
How can I make my Valentine’s Day manicure last through the actual holiday?
Start your manicure three to four days before Valentine’s Day rather than the night before. This timing allows you to fix any small chips or issues that develop while still looking fresh for the actual celebration. Always use base coat and top coat, cap your nail edges during application, and avoid water for at least two hours after painting. Applying a fresh layer of top coat the day before Valentine’s Day refreshes shine and reinforces protection against wear.
What colors work for Valentine’s Day besides red and pink?
Deep burgundy, wine, merlot, and berry shades provide Valentine’s Day relevance while feeling more sophisticated than bright red. Soft nudes, milky whites, and sheer blacks create romantic bases for heart details or other decorative elements. Rich chocolate brown with pink accents offers unexpected but beautiful Valentine’s Day styling. The key is choosing colors that make you feel confident rather than forcing yourself into shades that don’t suit your style.
Can I create Valentine’s Day nails on very short natural nails?
Absolutely. Many simple Valentine’s Day designs actually look better on shorter nails than long ones. Micro hearts, thin line accents, single heart details, and classic solid colors all work beautifully on short nails. Avoid designs with multiple competing elements or large decorative pieces that overwhelm limited space. Focus on quality application and perfect shine rather than elaborate art, and your short nails will look polished and intentional.
How do I remove glitter or metallic Valentine’s Day polish easily?
Soak a cotton ball or pad in acetone-based nail polish remover and press it firmly against your nail for ten to fifteen seconds before wiping. This soaking action breaks down stubborn glitter and metallic particles more effectively than immediate rubbing. For particularly resistant polish, wrap the acetone-soaked cotton around each finger with aluminum foil and wait five minutes before wiping clean. Always follow polish removal with cuticle oil or hand cream to restore moisture. Zignalor
One Comment